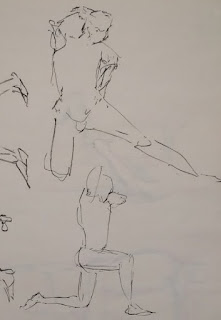
I wanted to post about my recent figure drawing sessions and describe what figure drawing studios are like. I attend the weekly figure drawing co-op at a local art college near me. For 7 dollars you get 4 hours in the studio. You and usually about twelve other people surround a dais where the figure model poses.
The poses start off quick. These ones were only 1 minute long. The model does big action poses, and you have to draw really fast. Today we did ten of these.
This time is for quick gestural drawings. Gesture drawings are loose sketches that are meant to get down the most crucial information in the short time you have. These are helpful in warming up, getting used to the proportions of the model, and because the poses are dramatic and the limbs and legs are extended from the body it is easy to get used to the model's proportions.
Then the model slows down the pose to anywhere from 2 to 5 minutes. Today we went to 5 minute poses. The poses are less exciting, because the model can’t hold action poses for such a long time. you can get a little more accurate in these drawings and a little more detailed. Today I decided to use different colored markers for different stages of the drawing. I started in red to sketch in the figure and work out any awkward missteps. Then I went in with the blue with more confident lines and continued to correct my mis-measurements.
Then the model will usually get a 15 minute break and return with longer poses. Today we went to 15 minute poses. Here I take my time to work out the proportions of the figure, measuring with my eye (or my pencil) where everything should be. I look for large masses of shadow and lightly mass in the big shadows. I like to define the edge of the shadow with a darker line and then mass in with light hatch marks. Again, I’m starting with the red marker, not being precious about marks, but just exploring the shapes and trying to get some approximation. Then with the black pen I make definitive marks describing the contours of the outlines of the body and edges of the largest shadows.
Sometimes the red lines are totally wrong, like the length of the standing figure’s thigh. Rather than being frustrating mistakes, these red lines are a record of where I went wrong, and where I corrected myself. If the mistakes remain in the drawing in this form, they are a tool to learn from. When you’re done drawing for the day, go home and look at all of them. You will almost certainly find patterns of where you went wrong and had to correct yourself. This is how you turn your weaknesses into strengths.
Then we usually end the session with one or two longer poses, anywhere from a half hour to an hour. Today we did a half hour pose and I practiced the sight-size method. Sight-size is a practice where the size of the drawing on the page is the size of the figure from your vantage point. You prop your drawing surface straight up, right next to the model in your field of view, and draw it making one to one comparisons of size and dimensions. This wasn’t a strict sight size drawing, which take much longer to do precisely, but I tried to get it pretty close. You can see on the left hand side the little notches drawn on the page. These are measurements of the positions of body parts.
Compare the above to this loose sketch done earlier in the day. I was still warming up and you can see all the missteps and corrections, the exaggerated length of the limbs and torso and the shakiness of the lines. Sight-size just makes drawing easier. And if you have the time to set it up and really measure everything carefully, you can reach an almost perfect depiction of the model.
If you are eager to do a longer pose, you can talk to your classmates about it and the model. It depends on the group though. Some are very structured, others are more of a conversation between the model and the class, someone will say what they want and the rest of the artists can yay or nay the idea.
I love visiting drawing groups like this. They are great for keeping your skills sharp and learning to adapt and try new things. I like to pick a spot in the class and never move even if I don’t like the perspective I have on the model for a certain pose. It forces me to learn to draw the figure from new angles.


Comments
Post a Comment